Monday, January 10, 2011

Bread and Butter Makes Everything Better

When I was 7 and Heather was 5, we used to go to a babysitter (yes, they were still called babysitters in those days) before and after school. I'd like to be able to tell you that she was a warm and cuddly woman, and that going to her house was a daily treat, like visiting a beloved family friend, but I'm afraid those words won't be passing these lips anytime soon.  The honest truth is that she scared the bejesus out of me on a  weekly basis. Bertha, as I'll call her - not least of which because I have a strong dislike for this name - was big and loud and her house was constantly teeming with children, both hers and other people's. I can't exactly remember how many children Bertha had, but I know that it was in the range of 8-10, which didn't include the 6 or so other children that she babysat each day.  Just writing that made me gasp a little... I'm thinking times have probably changed quite a bit in regards to the rules and regulations for home childcare facilities! Needless to say, all of these children kept Bertha in a perpetual state of "frazzlement". (Yes, I know that's not a real word, but it works here, don't you think?)

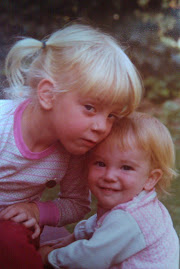
In the mornings when it was time to go to school, it was up to me to get my sister and I there.  The walk to school was only about two blocks from Bertha's house, but it required darting across a very busy street at lightning speed, during morning rush hour, after waiting until there was enough of a break in the traffic from both directions to make it across... an experience very reminiscent of the Atari game Frogger that was popular at the time.  This was done without the help of the elderly crossing guard who was usually napping in his car, completely unaware of the goings on at his post.  So every morning, I metaphorically put on my big girl pants and bravely got my sister and I to school - a trek which always left me winded and slightly queasy from the adrenaline rush.  But also proud because I was in charge of my little sister and I had done a good job of taking care of her!

Back at Bertha's house in the afternoon, we were required to take a nap... in separate rooms. Rooms that were locked with a bolt on the outside top of the doors (where was the Fire Marshall when I needed him?!) - a daily routine that I abhorred because it separated me from my sister for at least an hour. How was I going to make sure that she was okay, if I couldn't even get to her? How would I protect her if something bad were to happen? I think that most days, she fell asleep fairly easily in her own room, but I rarely did. Some days I would cry and pound on the door for awhile, sure that Bertha would eventually take pity on me and let me out of my prison, though she never did.  Other days I laid on the bed, eyes wide open, counting the minutes until naptime was over.  And then finally one day, as I lay brooding on top of the covers, I spotted the perfect way to get back at that old meanie.  In a pint-sized fit of rage, I took a tube of lipstick that I found lying on the dresser, and after carefully pulling the dresser far enough away from the wall to squeeze part way in, I wrote my name in bright pink capital letters on the wall.  I was tickled by my naughtiness and my ingenuity... until naptime was over and Bertha discovered my artwork on her bedroom wall.  My plan, though admittedly not well thought out, was that she wouldn't discover my handiwork until after we had gone home for the day.  But alas, I had not done a very good job of shimmying the dresser back into its proper place.  Also, in hindsight, it might have been a good idea to have written something other than my own name.... it's hard to defend yourself with the standard, "It wasn't me!" when you have that kind of evidence staring you in the face.

As you can imagine, Bertha was not happy with my antics, and when my mother came to pick us up that day, Bertha marched her back to the bedroom to see firsthand just how naughty I had been. But I was secretly pleased with myself.  After all, separating me from my sister was no small transgression in my eyes, and she deserved that lipstick signature and a whole lot more, as far as I was concerned.  Looking back, I don't think my mom was a huge fan of Bertha or her babysitting techniques either, because I don't remember ever getting into trouble for that incident.  I'd like to think that my mom was secretly proud of my scrappiness as well.

To this day, one of my go-to comfort foods is bread and butter... and I have a theory that this is directly related to the time I spent at Bertha's house.  Bread and butter was one of the only constants there.  The home I shared with my sister and parents was as silent as a nunnery compared to Bertha's house with all those kids running around, but amidst the chaos and confusion, there was always an abundance of Wonder Bread and Blue Bonnet margarine to be had.  I'm sure that I must have eaten other things there, but I only truly remember the snacks of bread and butter... the brief reprieves from the stressful environment, when for a few moments all I was focused on was the taste of salty butter and toast in my mouth.  Then, it was back to work as my sister's "ultimate defender".

Bread and butter is still one of my favorite foods, though thankfully, my taste has matured beyond the likes of Wonder Bread and Blue Bonnet.  Most recently when I had a craving for bread and butter, I whipped up a batch of Beer Bread - really, one of the easiest kinds of bread out there to make.  The basic recipe only has a handful of ingredients and you can experiment with whatever kind of beer suits your fancy (different beers add slightly different flavors - though I find that a lighter ale tastes better than a darker ale or stout).  It makes the perfect accompaniment to lots of different winter soups, and because I make my beer bread with one part wheat flour to two parts white flour, it is fairly dense and hearty.

 Basic Beer Bread


  • 2 cups unbleached all-purpose flour
  • 1 cup whole wheat flour
  • 3 teaspoons baking powder
  • 1 teaspoon salt
  • 1/4 cup sugar (some recipes use as little as 2 Tbs, some omit it altogether)
  • 1 12-oz can of beer
  • 2 Tablespoons melted butter
  1. Preheat oven to 375 degrees and lightly grease or spray a 9x5x3 in loaf pan.
  2. Mix dry ingredients and beer in medium mixing bowl. (1-2 Tbs of water can be added to mixture if needed.)
  3. Pour into greased loaf pan and spread melted butter over top of mixture.
  4. Bake for 1 hour (start checking for doneness around 50 minutes). Cool in pan on rack for 10 minutes. Remove from pan and cool on rack for another 10 minutes before eating.
Note -  This bread can be made with 3 cups all purpose flour if you prefer a lighter white bread. You can also add herbs, seeds or cheese to this bread to add variety to the basic recipe.


Yes, I do love me some butter!


Happy New Year to everyone! 
Enjoy!
- Colleen


Monday, September 6, 2010

Comfort Me With Pancakes

I have a secret to share with you. Yes, I'm just going to come out with it, right here at the beginning of this post. I hope you won't feel differently about me. Here goes...I am slightly neurotic, of the obsessive-compulsive variety. And for those of you who know me well, you also know that what I just said is an under-exaggeration, probably a big one. Now, I do think that OCD lies on a continuum and I would probably place myself somewhere in the middle. Okay, maybe slightly to the upper side of middle. But I'm certainly not like those really extreme cases you see on Oprah or TLC where the person has some ritual of turning off the stove 20 times in a row, or locking the door half a billion times before they can leave the house. Really people, I'm not that crazy. But as some of you already know... I do live by a lot of rules. They are rules of my own making of course, because as my sweetie likes to point out every now and again, when I'm being particularly rebellious, I do not like being told what to do (or what not to do!) I'm guessing it's got something to do with the German, Irish and Italian blood running through these veins, all three cultures of which are known to possess at least a smidgen of stubbornness.

So about these rules...let me enlighten you with a few examples. One rule I have is that I never watch a movie more than once. Well, maybe not never, but rarely. There are just too many good movies out there and life is too short to watch the same ones over and over. I'd be wasting time, and time is a precious commodity to someone with OCD. And while we're on the topic of movies, I almost never watch movies by myself. Documentaries, yes. Movies, no. Even I can't really explain that one. Another rule I have is that I don't allow eating in the bed. I know plenty of people who love to lie in bed watching movies and eating their favorite snacks. Well, mostly men, really. But that is not allowed in my house. I can't think of too many ickier things than crawling into bed and feeling crumbs on the sheets. One more rule, just to give you a better picture of who you're dealing with...the kitchen drawers below where the coffee pot sits need to be tightly closed before pulling out the bag of sugar to doctor your coffee. Now that one makes perfect sense, doesn't it?

And to these rules...and a multitude of other rules... I strictly adhere. Most of my rules have to do with cleanliness, as I am a neat freak, and the others govern my daily routines. I know what some of you are thinking. My AJ must be a saint to put up with all of this anal-retentive madness. And you'd be right. Oh, so right. Usually, when I'm spouting some nonsense about yet another rule, he looks at me with his head cocked to the side, trying to figure out if I'm joking or being serious, and either way, he just laughs and goes on about his day, letting it all roll off his back. Well, most of it. He does close the drawers below the coffee pot when making his morning coffee... which he proudly points out to me on a regular basis!

So as you can imagine, someone who likes their rules and routines has a hard time with change. Even the good kinds of change. And as of late, I've been more than a little stressed out. Change is on its way - I can smell it in the air. And I'm not just talking about the Fall weather. Remember all those months ago, when my sister and I first started this blog, and I talked about wanting to find a new job? Well, I think I'm almost there. I say "almost" because I'm not 100% certain yet, but I have gone to three interviews for a Program Director position, and I'm thinking that is a pretty good sign. I'm supposed to find out by the end of the week. Part of me is freaked out that I won't get the job, and part of me is freaked out that I will. Because then I actually have to do the job, and what if I don't know what I'm doing?! ( Did I mention that as someone with OCD tendencies, I also have a little extra anxiety on hand?) Of course, I'd much rather find a job getting paid to eat, or write, or sit on my couch and read books while drinking tea and nibbling on homemade cookies, but until that job comes along, I think this other one will work out pretty nicely.

The other big thing in the works is that I'm trying to get my house ready to be put on the market. And for those of you who have never gotten a house ready for sale, let me just tell you that it takes a lot of blood, sweat and tears... oh, and a considerable amount of money, of which I do not have an abundance. (Lottery gods, are you listening?) And the strange irony behind getting your house beautified for sale is that it ends up looking more fantastic than it ever did when you lived there. You limped along with the paint that needed touch-ups, and the aging appliances, and the cracked faucet, and the new owners get to walk into a picture-perfect house. Which works out in the end, I suppose, if the next house you buy is as sparkling as the one you just left. But I have come to the conclusion that even though my house will look terrific with all the updates, it is just a little too cozy. My house is the perfect size for two adults, even for two adults and one child, but not for two adults and two children, fast galloping into their preteen years. The house feels like it's getting smaller by the second...and for a person who likes "a place for everything, and everything in its place", this is an ongoing, full-scale battle... a battle, sadly, that I am not winning.

There is also a trip to Orlando planned for December, and a trip in its beginning planning stages to Israel next July, and a weekend trip to Bend this Fall for a literary conference. And when I take a moment for a time-out from all this anxious stressing, I really can appreciate all the goodness that lies ahead in the coming months. I mean, really, what have I got to complain about... the possibility of a new job, a new house, two major vacations and a weekend getaway... I know there is a lesson to be learned here. Something to do with appreciating the journey as much as the end result, maybe?

So as I'm forging my way through these stressful, yet full-of-promise, upcoming months, I sometimes need some comfort food. (You knew I was getting to the food part somewhere in all this.) I try not to turn to comfort food too often, since I don't want to get as big as the house I'm trying to sell, and have yet another thing to stress about. But sometimes, a comfort food meal does wonders for the soul - especially when it's breakfast food served for dinner. I recently came across a yummy recipe for berry pancakes in a Rachel Ray magazine that I modified to my liking. The original recipe calls for raspberries and blueberries, but unless you have fresh raspberries on hand, I would recommend leaving them out. Thawed-out frozen raspberries make a pretty soggy pancake in my experience, even when you strain them. I usually make a full batch of pancakes, so that I can refrigerate the leftovers and eat them throughout the week.


Berry Pancakes

1 1/2 half cups whole fat plain yogurt (you could substitute low-fat here)
1 egg plus 2 egg whites
1/2 cup water
1 tsp vanilla
1 tsp baking soda
1/4 tsp salt
1 1/4 cups flour
1 cup blueberries (or a little more if you wish)
1 Tbs vegetable oil

1. Whisk together the yogurt, egg and egg whites, the water and the vanilla until smooth. Then whisk in the baking soda and salt, and then the flour, just until blended. Stir in the vegetable oil and then the blueberries.

2. Take 1/4 cupfuls and drop them onto a skillet over medium heat. (I use a non-stick skillet so I don't have to use any extra oil or butter in the cooking process.) Watch for lots of bubbles to appear on the surface of the pancake (about 3 minutes), which means it's ready to be flipped. Cook the second side for about 1 minute.

These pancakes taste great with maple syrup or just with powdered sugar and extra berries. Hope they bring a little comfort your way. 

Enjoy!
- Colleen

Monday, August 2, 2010

The Most Magical Day

As many of you already know, my sister got married last weekend at Mt. Hood Organic Farm, outside of Hood River, OR. It was an absolutely beautiful event, on a perfect, clear sunny day, in the most picturesque setting imaginable.

Photo by Leah Abbott
 
And everyone is still talking about it... about how stunningly beautiful Heather was in her frothy, white gown and lace shrug, about how the happy couple couldn't stop beaming all day long, about how amazing the scenery was, about all the homemade touches that made the event so unique and personal, but mostly about how much fun everyone had! And about how blessed everyone felt to be taking part in the union of two people who are obviously meant to be together, surrounded by family and friends who truly love them. It was a magical day filled with love and laughter, joy and celebration.

Photo by Leah Abbott


Of course, this beautiful day was not without lots of behind-the-scenes work by many family and friends (thank you so much to all of you!!) I, myself, made the cakes for my sister's big day. Yes, you read that correctly... If you would have asked me a couple of years ago if I would consider making the cakes for my sister's wedding, I would surely have looked at you as if you had lost your mind. Me? Make the cakes for a wedding? For my favorite sister in the whole world? Such potential for disaster! I would have shaken my head in wonder that you would even suggest such a thing, and then would have rambled on about how that would just be too scary, too stressful, too much to do, too many people depending on me, too many palates to please, too many eyes on me, just... too much!  But somehow, that is exactly what happened... I did make the cakes for my sister's wedding, and it was a complete and total success... so many compliments and smiling faces that I felt like I was floating on a cloud (of course, the glasses of wine I had to drink probably also played a small part in this!). And here I am a week later, still slightly dazed by the whole thing, wondering how in the world did I pull that off?

The idea started percolating in the minds of the Stumptown Sisters sometime last year. We had both read Molly Wizenberg's book A Homemade Life and absolutely adored both the author and her story. In her book, Molly talks about making the cakes for her own wedding , the "Winning Hearts and Minds" chocolate cake, and she made twenty of them. Heather and I both thought this was an intriguing idea - homemade cakes for a wedding - nothing too fancy-pants or pretentious, just down-to-earth, delicious cakes, made from scratch with love, to be shared with all of the people we care about most. As we daydreamed about what kind of wedding Heather might have, and what time of year it would take place, and what colors she wanted to have, we continued tossing around the idea of making our own cakes... though I must admit, that somewhere in the back of my mind I secretly held onto reservations that this wasn't really practical or possible.

And then one day last Fall, we were hiking my favorite trail, Eagle Creek, and we were once again talking weddings and recipes and cakes, and all of a sudden, it didn't seem like such a crazy idea anymore. Maybe it was the magic I feel sure that this trail possesses - or more likely just the adrenaline running through my body as we trudged up the steep incline - but whatever it was, the idea of baking the cakes for Heather's wedding seemed completely doable, and what's more, I knew without a doubt that I would bake them, however many that turned out to be!

Photo by Leah Abbott
 
And so, since we were inspired by Molly Wizenberg to begin with, we had to make some of the "Winning Hearts and Minds" chocolate cakes. (These cakes are rich chocolate and velvety, almost like a molten cake in the middle, but served at room temperature, not warm. Mmmm....)  And to these we added some of the Irish Guinness cakes that I talked about in an earlier blog. And finally we added one of my favorite cake recipes, an Orange Almond cake, that is so simple to make, and yet so fragrant and delicious. We chose all three of these cakes partly because we knew (after putting each cake to the test) that they could be made ahead of time and frozen until the day before the wedding. (The secret to them keeping so well is to carefully, but tightly, wrap each cake in several layers of plastic wrap and then to wrap them completely in heavy duty aluminum foil before putting them in the freezer. Thaw them out starting 24 hours before they are to be served. Let them thaw still completely wrapped in all their layers and they will not disappoint.)

In all, I baked nine cakes, three of each kind, and with the addition of a beautiful and delicious carrot cake that Heather's friend Mike so generously made, the cake table looked decadent.... each cake laid out beautifully on it's own antique cake plate, atop a tablecloth made from the lace veil our mother wore at her wedding, with little pitchers of homemade raspberry sauce to be drizzled over slices of cake...sigh... if only I had taken a picture of this lovely scene....(you will have to use your imaginations here).  Since I have already shared about the Irish Guinness cake, and have provided the link for you to read about Molly's "Winning Hearts" cake, I will share with you the recipe for the Orange-Almond cake which I found online a couple of years ago, posted by a woman named Jeanne  Lemlin....

Orange-Almond Cake
  • 7 to 8 oz almond paste (not marzipan!)
  • 1 stick unsalted butter, very soft
  • 1 cup sugar
  • 2 Tbsp orange liqueur (such as Grand Marnier or Cointreau)
  • Grated zest from 1 orange 
  • 5 large eggs, room temp
  • 1/2 cup cake flour (such as Softasilk)
  • 1 tsp baking powder
  • powdered sugar for dusting
  1. Preheat the oven to 325 degrees. Butter a 9-in springform pan, cover the bottom with a round of parchment paper, butter the paper, and then dust the whole pan with flour. Set aside.
  2. Break the almond paste into smaller chunks and then place it in a food processor. Process for several seconds until the paste looks grainy, like the texture of couscous. Set aside.
  3. In a large bowl, or in a stand mixer, beat the butter and sugar together until fluffy, approximately 2-3 minutes. Add the processed almond paste, orange liqueur, and orange zest. Beat until well-blended, approximately 2 minutes or so. 
  4. Beat in each egg, one at a time, until the mixture is smooth and fluffy, approx. 2 minutes. Add the flour and baking powder and beat for about 30 seconds or so, just until all the ingredients are combined.
  5. Pour the batter into the prepared pan and bake for about 55 minutes, or until a toothpick inserted in the middle comes out clean. The sides of the cake will have started to shrink away from the edges of the pan. Cool the cake on a wire rack for 10 minutes and then remove the outer ring of the pan. (The cake might sink a little in the middle - this is normal) Invert the cake onto a plate in order to remove the bottom of the pan, then invert the cake back onto the wire rack to cool completely. Before serving, dust the cake with powdered sugar.
This cake tastes great with the raspberry sauce, or with fresh fruit and whipped cream...or with all of the above!!

Enjoy!
-Colleen

Thursday, July 8, 2010

Brownies... The Portable Treat

It appears that summer is finally upon is, and so is my desire to go on a good long hike. One where you feel like you could hike forever into the increasingly beautiful scenery, where the trees have been towering over the trail for hundreds of years, where the birds are chirping, where you just want to see what's around the next bend, and the next... until you turn around to start heading back to the trailhead and you discover that you might have overestimated your strength and stamina just a wee bit, and then it hits you with a sinking realization that your legs have turned to spaghetti, and with a big sigh (that you try, perhaps unsuccessfully, to keep from your hiking partners) you come to the understanding that it is going to feel like an eternity before you come stumbling off the trail and can collapse into your car. You might even experience a moment of panic where you wonder if you are ever going to make it back to your car alive. But then you snap yourself out of it, and remember that you are a Girl Scout and a foodie at heart, and even if you had to spend the night huddled by the side of the trail, which you've never actually had to do, you've got a jacket and plenty of snacks! Hmm... does it sound like I'm speaking from experience?

Yes, my sister and I have done our fair share of hikes, and not always in fair weather. We have hiked in the blistering sun, in the snow, in mist, drizzle, sprinkles, showers, torrential downpours, thunder storms and any other euphemisms you can come up with for wet, rainy conditions. (Oregonians are especially good at coming up with these colorful descriptions of wet weather. I guess you have to get creative when most days between October and May... okay, okay, October and July, consist mainly of the wet stuff!)

A few years ago, Heather and I went to Montana for a couple of weeks in the middle of summer. We stayed in our favorite town of Bozeman, and as soon as we got our campsite set up, we started mapping out all the outdoor activities we wanted to do over the ensuing days. We didn't have any time to waste - our list was too long, and our vacation was too short, so we had to get the party started, as they say. High on the to-do list was a lengthy hike (approximately 24 miles round trip) up to a lake, just outside of town. In hindsight, it might have been a good idea to take a few extra minutes and check into the weather forecast for the week. But alas, youthful impatience and exuberant optimism won out, and as we discovered too late, the day we chose to do this particular hike the temperature was in the upper 90's. And while we usually liked to pick trails that ran alongside a stream or a small river, this trail was as dusty and dry as they come, with only the distant promise of a lake once we reached the summit. (Picture a couple of cowgirls, riding down a dusty trail, on a hot summer day, with a cloud of dirt in their wake, and that would be us... only without the horses, which as it turns out, would have come in very handy.)

We started out with smiles and ample energy, and lots of conversation. But as the sun reached higher in the sky, and the temperature continued to climb, the sweat started to pour, and the chatter dwindled. The hike was losing its charm by the minute. It didn't help that the horse flies were relentless, and we had neglected to bring any bug spray. (Oh, where were my Girl Scout instincts then?!) We started to develop chafing and chapping, and in our sun-induced delirium, started talking about inventing underwear infused with Gold Bond powder to help with chapping in some specific areas... which I will not mention further.

Most sane people would have thrown in the towel, admitted defeat, and headed back to the car to eat their picnic lunch in air-conditioned comfort. But not the Wonder Twins - we were going to make it to that damn lake if it killed us! And make it we did, complete with battle scars to prove our accomplishment. And I'll tell you what, that lake was not worth the sweat equity we put in to reach it. It was... well, ordinary to say the least. There was hardly any shade to speak of, and by this point we were pretty darn miserable. In fact, it was completely disappointing. And while we sat there eating the food we had carried on our backs up the mountain, those horrible, nasty flies continued to bite us. (So, after describing this lovely hike to all of you, if there are any interested parties, just email me and I would be happy to send you directions to the trailhead - ha-ha.)

In case you're left wondering if I've ever been on any relaxing, peaceful, inspiring hikes, I have. My favorite local hike is the Eagle Creek trail off of Highway 84 (exit 41) - it has everything you need for a perfect hiking experience, water, trees, breath-taking cliffs, and beautiful bridges... and no horse flies or other biting creatures. But there is one thing I have noticed when it comes to hiking, something all hikes have in common, whether they are awe-inspiring or just ho-hum... the food you eat along the way. I don't mean that the food is anything special. In fact, it's usually quite the opposite, things like PB&J sandwiches, fruit, some trail mix, maybe some Oreo cookies. But somehow it doesn't matter what it is, after a long hike it always seems like the best food you've ever eaten in your life. A PB&J sandwich feels like a gourmet delicacy. Well, okay, that might be stretching it just a bit, but you have to admit, if you've ever gone hiking you know just what I'm talking about.

Which brings me to the recipe I want to share with you today. A recipe for cream-cheese swirled brownies that make the perfect portable treat to take along on a hike, or a picnic, or a bike ride, or wherever your summer activities take you. These brownies really are delicious. You won't need to work up a sweat just to appreciate them, though that would probably make them even better. This recipe is actually a combination of two different recipes, one from Maida Heatter's Book of Great Desserts and the other from a recipe that my mother had. The brownie has a cake-like texture, not the dense fudgy kind that some recipes make, which in my opinion makes it a little easier to transport!

Cream Cheese Swirled Brownies

Brownie:
  • 5 oz. unsweetened chocolate (like the Baker's chocolate bars in the baking aisle)
  • 1 1/2 sticks (6 oz) butter
  • 4 eggs
  • 1/2 tsp salt
  • 2 cups sugar
  • 1 tsp vanilla extract
  • 1/4 tsp almond extract
  • 1 cup sifted all-purpose flour (sift the flour first, then measure out a cup)
Cream Cheese mixture:
  • 8 oz. cream cheese (regular, not low-fat)
  • 1 egg
  • 1/3 cup sugar
  • 1/8 tsp salt
  1.  Preheat oven to 450 degrees. Butter and line a 15 1/2 x 10 1/2 x 1 in jelly-roll pan with aluminum foil. (Maida Heatter has a good trick for doing this. Flip the pan upside down and then center a piece of foil about 18 to 19 in long over the pan, shiny side down. Fold down the sides and corners to shape the foil to the pan. Then take the foil off, flip the pan back over, and then carefully press the now-molded foil into place.) Then butter the foil.
  2. Melt the chocolate and butter in a saucepan over low heat (or in a double boiler). Whisk to blend. Once thoroughly melted and mixed, remove from the heat and set aside.
  3. Beat the eggs and salt in a stand mixer until slightly fluffy. Gradually add the sugar and continue to beat on medium-high speed for 10 minutes or so until the mixture forms a "ribbon" when the beater is raised. 
  4. Add the almond and vanilla extracts to the cooled chocolate mixture. Then on the lowest mixing speed add the chocolate mixture to the egg mixture, beating only enough to blend. You will probably need to stop here and scrape down the bowl as well. 
  5. Still using the lowest speed, add the flour, beating just enough to blend. Pour into the prepared pan and use a rubber spatula to spread smooth. 
  6. Combine the cream cheese, the egg, the sugar and salt and beat well, until the mixture is creamy and smooth. Spoon or pour the cream cheese mixture onto the wet brownie mixture in two parallel lines running the longest direction of the pan.Then take a butter knife and run the knife in a z-pattern back and forth across the pan in the shortest direction. This will make a neat swirl pattern in your brownies. Don't over swirl them, as this will make the pattern look messy.
  7. Put the pan in the oven and immediately turn the oven down to 400 degrees. Bake for approximately 22 minutes. The cream cheese mixture may look like it's not done, but will firm up as the brownies cool. 
  8. Remove from the oven. Let cool for about five minutes on a baking rack, then cover pan with baking rack and flip over. Remove the pan and foil from the brownies. Then cover the brownies with another rack or large cookie sheet (even a lightweight cutting board would work) and flip back over so that they are right side up. Cool completely before cutting into squares.
I hope these brownies find their way into your backpack or picnic basket this summer! Enjoy!

- Colleen


    Monday, June 7, 2010

    The Scent of Strawberries

    Sometimes, when we were kids, my sister and I would stay at my grandparent's house when my parents went out of town. This didn't happen that often, so it was a little like a mini-adventure each time we went to stay. Once there and settled in, I had a ritual of making a slow circuit of the house, looking at all of my grandmother's shelves and cabinets to see if any of the knick-knacks and doo-dads had changed or moved. I don't remember that anything ever did. And there was something oddly soothing in the fact that things were always in their place, just where I remembered seeing them the last time. My grandma's house was not very big, and the entire journey around the house probably took less than ten minutes, but it always ended in one place...in front of the china cabinet that held a special candle. The candle was a small white teacup resting on a matching saucer, and the two pieces were decorated with strawberries and blossoms. But the best part was the strawberry scented candle that filled that teacup. Each time I went to Grandma's, I asked her to take the candle down off the shelf so I could hold it, and then I'd slowly take a big whiff of the intoxicating strawberry scent.

    A few years ago, it was time to move Grandma into a retirement home, and as we packed up her house, and she decided what to keep and what to give away, we came across the strawberry teacup candle. She smiled when she handed it over to me, remembering how much I had always loved it as a child. Today, the candle sits on my bookshelf in my living room, reminding me of my grandmother and her life-long love of everything strawberry. I decided that when my grandmother passes on, I am going to burn the strawberry candle in her honor, and let the heavenly scent of strawberries float with her on her journey. I have not told my grandmother that this is what I plan to do, but somehow I know that it would make her tremendously happy to be remembered with our favorite strawberry candle.

    I thought of my grandmother this weekend, as I went strawberry picking out on Sauvie Island with my mom and sister. I know that in her younger years, she would have loved to have been out there with us. There is something magical about being in a field of strawberry plants and breathing in the sweet smell of freshly ripe strawberries. And eating them as you pluck them off the stem is simply divine (after carefully inspecting them for dirt and bugs, of course!). This is something we do every year, at least once during strawberry season, and Saturday was a beautiful day for it - plenty of sunshine and cool breezes. After meticulously selecting the most perfectly ripened, plumpest strawberries I could find, I couldn't wait to get home and try a new recipe that I had found in The Oregonian. The recipe is by Deborah Madison and is called a Right-Side-Up Cake. It can be made with any kind of fruit, from apricots, to peaches, to blueberries, to pitted cherries, or any combination that suits your fancy. I had planned to make the cake with strawberries, nectarines and apricots, but after forgetting my apricots and nectarines at my mom's house, I decided I was too impatient to wait and went ahead and made the cake with only the strawberries. It came out very tasty and doesn't dirty a lot of dishes... a win-win after being in the strawberry fields for a couple of hours!

    *Note- I ate this cake the first day I made it and again the following two days (hey, somebody had to taste-test the cake!) and the almond flavor definitely intensified over time. I will post the original recipe but note that I would reduce the almond extract to 1/8 tsp, and might even experiment with removing it altogether to give a more subtle almond flavor. Also, though the cake was delicious with only one type of fruit, I think it would be even better with two or three varieties in combination.


    Right-Side-Up Cake

    Topping:
    • 1 1/2 cups fruit (chopped to small pieces)
    • 2 Tbs granulated sugar
    Cake:
    • 3 1/2 oz almond paste (not marzipan)
    • 2/3 cup granulated sugar
    • 1/2 cup unsalted butter, room temperature
    • 3 eggs, room temperature
    • 1 tsp vanilla
    • 1/4 tsp almond extract (again, I would probably use 1/8 tsp next time)
    • 1/2 cup sour cream or plain yogurt
    • 2/3 cup corn flour (not cornmeal, I used Bob's Red Mill)
    • 2/3 cup all-purpose flour
    • 3/4 tsp baking powder
    • 1/4 tsp salt
    • powdered sugar, for dusting top of cake
    1. Preheat oven to 375 degrees. Coat a 5-by-8-inch springform pan with butter. Line the bottom of the pan with a round of parchment paper and butter this as well.
    2. For the topping, toss the fruit and sugar in a medium bowl and set aside.
    3. In a food processor, combine the almond paste and sugar and pulse until evenly combined. Add the butter and pulse until well combined. With the machine running, add the eggs, one at a time, until well-blended. Scrape down the sides of the bowl, then add the vanilla and almond extracts and the sour cream. Blend until smooth.
    4. In a medium bowl (or on a large piece of wax paper, so as not to dirty another bowl!), mix the corn flour, all-purpose flour, baking powder and salt. Add half of the dry ingredients to the mixer and pulse 3 times. Add the second half and pulse another 3 times. Scrape the bowl to make sure everything is incorporated and then pulse 3-4 more times.
    5. Pour the batter into the prepared pan and smooth the top. Pile the fruit over the top. Bake in the center of the oven until lightly browned and springy when pressed with a fingertip, about 1 hour or slightly longer.
    6. Let stand for 10 minutes before removing from the pan. Dust with powdered sugar. Let cool to room temperature before slicing. Can be served with whipped cream and fresh fruit if desired.

    Enjoy!
    -Colleen

    Saturday, May 29, 2010

    The Cookies of Life...

    A couple of weeks ago, my friend Brenda and I (and her sister Debbie) took off to New York City for a girls' weekend. The mission? To attend an Oprah Live Your Best Life Weekend in honor of the 10th Anniversary of her O Magazine. We had no idea what to expect, and of course, being that it was an Oprah event, we secretly (or maybe not so secretly since we speculated on this with everyone we know!) had hopes of coming home with a new car, or a new house, or a fabulous trip, or maybe a check with which to start a dream business (like the Stumptown Sisters' Bakery Cafe)... One of us might even have had a dream before they left on the trip that when they walked through the door to attend the convention, an Oprah representative handed them a door prize, a check for $10,000!! I won't mention any names, but you get the idea. And don't even try to pretend that you wouldn't have had those same thoughts too. Of course, you would have, it's Oprah we're talking about here!

    But alas, that was not to be... Instead, we got to stand in line after annoying line just to be herded like cattle from one event to the next. Even with our pre-purchased tickets we had to stand in line for the opening night welcome event, and each of the three workshops, and for lunch, and for the Oprah event at Radio City Music Hall. And for the bathroom... Needless to say, this did not match up to the posh treatment we were expecting to receive. Though the workshops themselves were certainly inspiring and definitely left an impression on us, the overall event just didn't seem to be organized as well as it could have been, which if I was being perfectly honest, was a little disappointing.

    But in the end, we still managed to have a fabulous trip. I mean, come on, we were in Manhattan, after all! We got to go to Ellis Island and the Statue of Liberty, and Ground Zero, and Times Square, and the massive FAO Schwartz store. Plus, we got to eat a slice of real New York pizza. Oh, and we saw Denzel Washington as he came out of a theater where he is starring in a Broadway play. And, as an added bonus, we walked so much I actually lost a few pounds!! Yes, you read that right, I actually lost weight on a vacation. Now if that isn't the icing on the cake, I don't know what is!

    But for me, the best part of the trip was getting to know my friend Brenda better. We spent the entire flight back talking nonstop about our lives, and our growing up years, and our relationships. It was one of those bonding moments that makes you feel all warm and fuzzy on the inside. And for some reason, whenever I think of this trip, a certain phrase from childhood keeps flashing across my mind. Okay, I know this needs some explanation....

    Let me just start by saying, I have never been the best gift giver. Don't get me wrong, I always have good intentions, but I am a perfectionist by nature, and when it comes down to selecting a gift, I freak out. Nothing ever seems to be quite right, so I go back and forth on which item to buy the person until I finally just pick something out of sheer desperation. So jump back with me a couple of decades (okay... a couple of decades and a half) to when I was about 10 years old. I was looking forward to going to a friend's birthday party but I needed to find a gift. My ever-patient mother trekked all over the mall with me searching for the perfect gift, and of course, I was starting to panic. Finally, we wandered into the Hallmark store and I found just what I was looking for! I picked out a yellow t-shirt with a big chocolate chip cookie on the front that said...In the Cookies of Life, Good Friends are the Chocolate Chips... I thought this shirt said it all. It was the perfect gift for one of my best friends.

    Looking back on this event now, I think I may have been a little ahead of my time. I'm thinking, too, that it might have been just a wee bit cheesy, not exactly the "coolest" gift. But for whatever reason that t-shirt and its slogan made quite the impression on me, and when I think of the trip to NY and the time I spent with Brenda, this phrase flashes like a neon sign across my mind. Because really, what would life be like without good friends and chocolate chip cookies?!

    So in honor of this sentiment, I'm going to share with you my favorite chocolate chip cookie recipe. This recipe is actually for white chocolate chip cookies with pecans (another dessert with pecans, yum!), though you could easily make them with regular chocolate chips and/or with walnuts, which I sometimes do... and they are just as tasty!


    White Chocolate Chip Pecan Cookies

    • 1/2 cup unsalted butter, at room temp
    • 1/2 cup shortening (preferably non-hydrogenated)
    • 3/4 cup sugar
    • 3/4 cup brown sugar
    • 3/4 tsp salt
    • 2 eggs
    • 1 tsp vanilla
    • 1 tsp baking soda
    • 2 2/3 cup flour
    • 1 cup pecans (hand broken into small pieces)
    • 12 oz white chocolate chips
    1. Cream together the butter, shortening, sugar and brown sugar, and salt.
    2. Add in eggs one at a time and beat until well blended. Add vanilla.
    3. Slowly mix in flour and baking soda. Once this is combined well, add in the pecans and chocolate chips and stir to evenly distribute the chips and nuts.


    *The original recipe says that each step should be stirred by hand. But I'm a weakling and use my stand mixer for this entire recipe. It seems to come out just fine this way as well.

    4. If you have time, refrigerate the dough for approximately 45-60 minutes. This helps the cookies to keep their shape and not spread out too much when cooking.
    5. Scoop spoonfuls onto a baking sheet ( I like to use a sheet of parchment paper or a silicone baking liner to prevent any sticking) and bake at 375 degrees for 9-10 min.

    **Note - You can also make a chocolate cookie variation with this recipe by decreasing the flour to 2 cups and adding 3/4 cup of unsweetened cocoa.

    Hope you enjoy these as much as us!
    -Colleen

    P.S. I apologize for the fact that we have been seriously negligent in our blogger duties! But we do have a pretty good excuse... Heather just got engaged in April and is planning her wedding for September! So exciting!! But also a little stressful, and time-consuming, and sometimes exhausting... So we could be a little preoccupied over the next few months, but we will do our best to get back on track with our blog posts. :) Thanks for hanging in there with us!


    Monday, April 5, 2010

    The Best Chocolate Cake Ever

    When we were kids, my sister and I loved to experiment with things. By this, I mean that we made all kinds of crazy contraptions, some that worked, and some that didn't even come close. And frankly, when I think back on some of the things we "invented", I'm surprised that we didn't kill ourselves, or at least cause some serious bodily harm to one another. (I am proud to report that Heather and I both made it through our entire childhoods with no broken bones!) I believe that we follow after my father in this regard... the experiments, I mean... as he is a true scientist at heart, and is forever plotting little (and big) experiments. Just this weekend, he was rambling on about some "test" he and my mother tried with her decades-old stainless steel pots. I think I'll spare you the details on that one....

    Once upon a time, when we were about 7 and 9, Heather had the brilliant idea of gluing Lego wheels to the bottom of our tennis shoes, with the plan that we would "skate" down our steep driveway. As you can probably imagine, this idea didn't work out so well, as the little Lego wheels were pretty much crushed under our feet. Then, I had a brainstorm involving taking one of our metal patio chairs and putting each of the four legs into a skate and lashing it in as tightly as possible. This was also meant to be ridden down the same steep driveway and carefully maneuvered onto the grass at the bottom side of the hill. Of course, we didn't have any kind of steering mechanism and the skinny chair legs kept shifting around in the skates, causing the chair to tilt over and the two of us to go careening into the garage door. Once again, not very successful. Though I'm sure we provided lots of good chuckles for our neighbors...

    We were a pretty persistent and creative design team however, and despite these less than successful first attempts, we did finally manage to make one "go-kart" contraption that really did work. And if my mother had been there to witness our triumphant race, she probably would have had a heart attack. Or several. Since after tasting the glory, we couldn't get enough of the wind in our hair.... This elaborate plan involved taking our father's hand-cart (or dolly, I think they're called), which could be reconfigured to make a sort-of cart which was meant to be used for doing yard work... but which turned out, with the addition of some patio furniture cushions, to make a fabulous four-wheeled racing kart! We began by "driving" it down our driveway, but this lost its thrill soon enough, so we wheeled our kart down to the nearest cross street, which happened to be a very steep street named Alta. Alta was long enough to have about a dozen or so houses on it with a sidewalk that ran the length of the street, at the end of which was a T-intersection with another, somewhat busier street....So, as I'm sure you can guess by this point, we took turns hopping into the kart and whizzing down the hill with our stomachs in our throats.... with no brakes, no steering wheel, and basically, no where to safely stop the kart, but a small patch of grass off to the side at the bottom of the hill. Just thinking about it now is enough to fill me with terror! There really are some things that parents are better off just not knowing about... at least until much, much later.

    So this weekend, in the spirit of experimentation, albeit a much safer and saner brand of experimentation, my sister and I set out to test two different versions of the same recipe. I must give Heather full credit on the discovering of this recipe, since she first heard about it on NPR. The recipe is for Nigella Lawson's Chocolate Guinness Cake and it is out of this world! At this point, I would venture to say that it is my favorite chocolate cake recipe ever. And as someone who likes to bake, I think that is saying alot. Heather recently made this cake for my father's birthday celebration and after tasting and falling in love with it, I decided I needed the recipe too. (If I was being completely honest, I would have to admit that I could not stop thinking about this cake!) So I started looking around online and realized there are actually two versions of this cake, the original from Nigella's website, which I'll call the British version, and the recipe that Heather first used that was posted on the NPR website, which I'll call the American version. The interesting thing about this is that the British version is in metric units, such as grams, milliliters, etc., while the American version is in our standard baking measurements of cups and teaspoons and the converted measurements, while close, were not exactly the same. (The amount of butter used in the British version is almost double that used in the American version!). So you can see why we just had to have a true test kitchen experiment and bake one from each recipe, followed by a taste test. Which is exactly what we did... complete with our kitchen scales and a calculator, and our mother as sous-chef, since she's pretty handy in the kitchen herself...


    And the winner??? Well, I think that the final tally put the British version ahead by just a smidgen. However, with only six taste testers, there is probably a pretty big margin of error as far as scientific data goes! Plus, I might have been a little biased towards the British version, since that is the version I chose to bake... and even though it wasn't a competition, I might have been just a little jealous that my sister was the first one to discover this fabulous recipe. And what would the Stumptown Sisters' Test Kitchen be without a little friendly competition?!

    I highly recommend that you find some occasion for which you can bake this delicious cake as soon as possible! Trust us, you will be glad you did. It is so easy to make, and you will get rave reviews from friends and family, no matter which version you choose to make. I think it just might become your favorite chocolate cake recipe too!

    Enjoy!
    -Colleen